Postfix is a server-side application that allows you to implement the SMTP protocol to manage mail sending. It is one of the fastest solutions on the market, highly appreciated for the ease of its configuration and security.
In this tutorial how to install and configure the Postfix daemon on Ubuntu 18.04 will be explained.
First, connect to your server via an SSH connection. In case of a local server, go to the next point and open the terminal of your server.
Installation of Postfix
After connecting to the server via SSH, proceed with the installation of Postfix by running the following command:
$ sudo apt install postfixDuring the installation you will be asked to select the mail server configuration type to be configured:
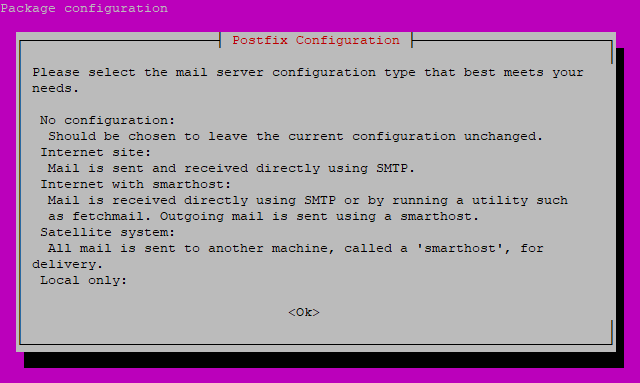
Use the TAB key to move on the “Ok” button and press ENTER to confirm.
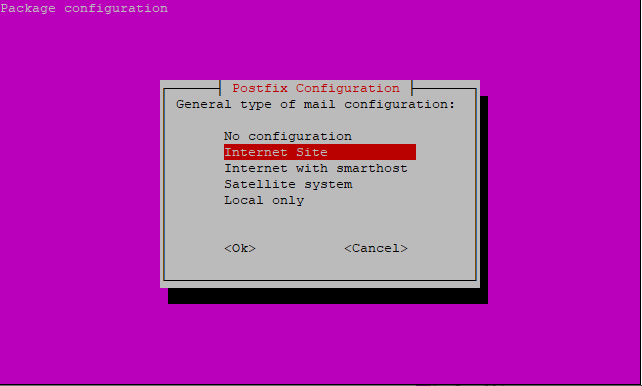
Use the TAB key again, select the “Internet Site” configuration and confirm with the “Ok” key.
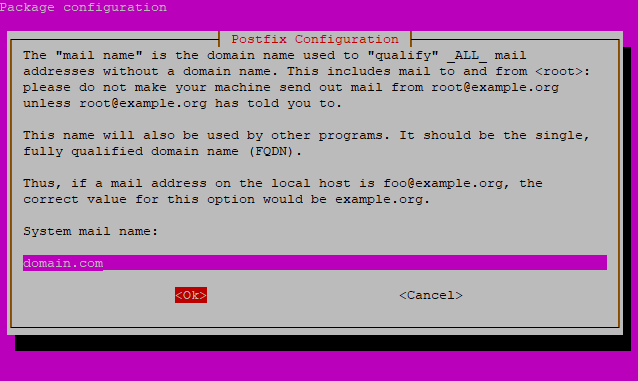
In the last screen, enter the domain used by the mail server to complete the configuration.
Once completed, Postfix should be properly installed on the system.
All Postfix configuration files are present in the / etc / postfix / folder. The two main files are main.cf and master.cf, although, for now, all you need to do is edit the main.cf file.
Before editing the main configuration file, make a backup of the existing version:
$ sudo cp /etc/postfix/main.cf /etc/postfix/main.cf.backupThen, proceed by opening the file you just copied with a text editor:
$ sudo vim /etc/postfix/main.cfAll configuration lines do not have to start with space or tab characters. Any comments have to begin with the # character. Some basic parameters to be modified are listed below:
# Main server DNS

myhostname = mail.domain.com

mydomain = domain.com

myorigin = $mydomain

#Parameters for the interface used for listening ports:

inet_interfaces = all

inet_protocols = ipv4

mydestination = $myhostname, localhost.$mydomain, localhost, $mydomain

mynetworks = 127.0.0.0/8 168.100.189.0/24

relay_domains =

#  Backing directory for saving mailboxes

home_mailbox = Maildir/
In the configuration parameters above, the domain “domain.com” is used as an example: replace it with the one in your possession.
This configuration allows you to use the Postfix server both to send emails from the outside (for example through a mail client) and the inside. However, in the event you used Postfix only to send emails from a web service installed on the same machine, changing some parameters to increase the security of the service is preferrable:
# Main server DNS

myhostname = mail.domain.com

mydomain = domain.com

myorigin = $mydomain

#Parameters for the interface used for listening ports:

inet_interfaces = localhost

inet_protocols = ipv4

mydestination = $myhostname, localhost.$mydomain, localhost, $mydomain

mynetworks = 127.0.0.0/8

relay_domains = $mydestination

#Backing directory for saving mailboxes

home_mailbox = Maildir/
After saving the file, install and start the service to apply all the changes you just made:
$ sudo systemctl enable postfix

$ sudo systemctl start postfix
Remember that any further modification to the configuration files, would entail the need to reload the service:
$ sudo systemctl reload postfixIn case of problems, remember that the status and operating parameters on Postfix may be examined in detail by using the log file in the directory:
$ sudo tail /var/log/mail.logFirewall configuration
In case of a firewall on your system, configure it to enable mail traffic.
When using the UFW firewall, pre-installed profiles for Postfix are provided. So let’s see how to enable them.
To check the available profiles installed in the UFW firewall run this command:
$ sudo ufw app listA list similar to the following will be shown on the screen:
Available applications:

  Dovecot IMAP

  Dovecot POP3

  Dovecot Secure IMAP

  Dovecot Secure POP3

  Nginx Full

  Nginx HTTP

  Nginx HTTPS

  OpenSSH

  Postfix

  Postfix SMTPS

  Postfix Submission
To allow mail traffic, use Postfix profiles.
To check profile information:
$ sudo ufw app info "Postfix"After checking the profiles, you’re ready to enable them:
$ sudo ufw allow "Postfix"

$ sudo ufw allow "Postfix SMTPS"

$ sudo ufw allow "Postfix Submission"
Let’s test the installation
To check the proper functioning of the server, proceed by using Telnet:
$ sudo telnet 127.0.0.1 25If Postfix works correctly, it should respond as follows:
Trying 127.0.0.1...

Connected to localhost.

Escape character is '^]'.

220 localhost ESMTP Postfix
To test the actual mail sending use the mailx package. To install it, use apt:
$ sudo apt install bsd-mailxOnce completed, run the command:
$ sudo mailx -r test@domain.com -s "SUBJECT" [EMAIL_ADDRESS]N.B. Replace [EMAIL_ADDRESS] with the email address you want to send the test message to. Remember also to replace “domain.com” with your previously set domain.
Mail is now waiting for the body of the message: enter any text of your choice and, once completed, press [ENTER] [POINT] and [ENTER] again, as follows:
$sudo mailx -r test@domain.com -s "SUBJECT" [EMAIL_ADDRESS]Message body . EOT #
You should receive the above email at the address entered within minutes.
Thank you for reading this article.
Was this helpful?
1 / 0
Very nice article.
Please keep this continue, thanks
Many many thanks bro
Well done!
Hi there! This is kind of off topic but I need some help from an established blog. Is it very difficult to set up your own blog? I’m not very techincal but I can figure things out pretty fast. I’m thinking about making my own but I’m not sure where to start. Do you have any tips or suggestions? Thank you
Hi there, its good article about media print, we all understand media is
a impressive source of facts.
Lovely just what I was searching for. Thanks to the author for taking his time on this one.
Really enjoyed this article.Thanks Again.
Say, you got a nice blog article.Really looking forward to read more.